
 Host: Brittany Angell of Real Sustenance
Exploring raw foodism as part of April in the Raw—where talented bloggers post a new raw recipe every day in April—is an eye opening experience.
We’re journeying beyond fresh, uncooked fruits and vegetables into the world of dehydrated foods. We’re learning how cooking food depletes its nutrients and increases free radicals—harmful molecules that promote aging and degenerative diseases. We’re sharing fun ways to get creative with a myriad of raw ingredients.
OK, granted, it takes a bit of research to comprehend what a raw food is and what it isn’t. For example, you might think all nuts and nut butters are raw. Nope. Nuts are most often blanched or roasted. How about milk? The pasteurized milk we find in our grocery stores is not raw. Nor are most oils and fats we use almost daily. In fact, most of what you find in your grocery store, unless in the produce or meat aisles, is not raw.
I’m not telling you anything you probably don’t already know. How often, though, do you think about how your food has been processed before it makes it’s way to your kitchen and onto your family’s plates? We think we’re the cooks when pretty much all the food we buy has been “cooked” in some way before it ever gets unpacked from our grocery bags.
Clearly before man discovered fire our entire species existed on a raw food diet. But sometime between then and now humans entered into a steamy love affair with cooked food—and the act of cooking became a passion for many of us.
Now raw foodsim is making a big comeback. Its modern birth actually dates back about a century ago to a Swiss physician, Maximillian Bircher-Benner (the creator of meusli), who began to treat patients with raw food diets. Years later the concept of adding more raw fruits and vegetables to our diets began to pick up steam and now it’s a full-fledged dietary lifestyle complete with its own restaurants, food blogs, and a place among the better health food store shelves.
Basically, raw foodism is the concept foods provide their maximum nutrition and therefore the most health benefits if they are not heated above 104 degrees F. Raw foodists consume most—or all—of their food in its raw state. You can blend it, chop it, mix it, and even dehydrate it—just don’t heat it beyond that magic number.
While my family will probably not abide by a strict raw food diet my eyes—and kitchen—have been opened to the health benefits of raw organic foods. We’ll be adding more healthy raw foods to our diets in order to enjoy not only the health benefits but the pure flavors raw foods provide.
I had a lot of fun creating this recipe and was absolutely delighted by how it turned out. My taste testers all gently picked up the first piece and I could see they were humoring me as it met their lips. However, when they reached for that second piece I knew they’d come over to the raw side.
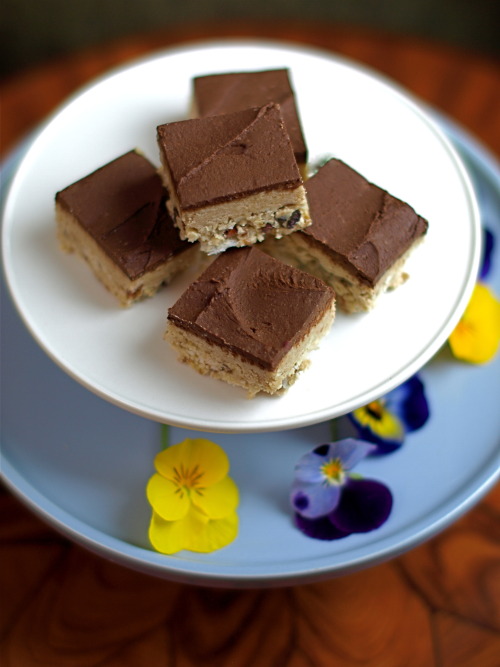
Raw Nutter Butter Bars
There are three separate layers in these babies. The bottom is crunchy and nutty. The middle layer is smooth and slightly sweet. And the finale—the top layer—is a raw chocolate ganache.
We’re going to make the middle layer first because we’ll be using a few tablespoons of it, a creamy cashew nut butter, as an ingredient in the bottom layer to hold it together.
Prepare an 8x8 inch baking pan by lining it with parchment paper.
Middle Layer
Add to the bowl of a large food processor and spin until they’re chopped to the size of tiny pebbles:
1 pound raw cashews
Remove 1 cup of the cashews and set aside to use for the bottom layer.
To the 2 cups of chopped cashews remaining in the food processor add and pulse until combined:
½ teaspoon Himalayan salt
½ teaspoon cinnamon
1/8 teaspoon allspice
pinch of ground cloves
4 tablespoons grated raw cacao butter
1 tablespoon raw honey or raw agave
Process for a minute or two on high. Pause the processor and scrape down the sides.
While the food processor is running on low add through the feeder hole and process until it becomes cashew nut butter (you may need to scrape down the sides a few times; you’ll know you’re done when the nut butter collects into a big ball in the processor bowl):
3-4 tablespoons melted raw coconut oil (see melting instructions below)
The cashew butter should be very thick. Remove it from the food processor to a bowl.
Bottom Layer
Add to the food processor and pulse a few times until the ingredients are combined (this layer is supposed to be coarsely chopped—one step prior to the mixture becoming the consistency of flour):
1 cup chopped cashews you set aside earlier
5 raw organic medjool dates (pits removed)
½ cup raw coconut flakes
1 tablespoon raw cacao nibs
1 tablespoon raw coconut oil, melted*
¼ teaspoon Himalayan salt
Remove to a small bowl and mix with a large spoon until combined:
4 tablespoons of the cashew nut butter you made for the middle layer
Scoop the mixture into the parchment lined pan and smooth it down with a spatula covering the entire bottom of the pan. Place another piece of parchment on top and press down with your hands to even up and compress the bottom layer.
Spoon the cashew butter over the bottom layer. Spread it out in an even layer until it has covered the entire pan.
Now onto the ganache…we’re almost done.
Top Layer
Grate and “melt” (see melting instructions below):
1 cup raw cacao butter (measured after it’s been grated; do not compress)
In a small bowl mix together with a hand mixer (or in a small food processor) until smooth and creamy:
Melted raw cacao butter
3/8 cup raw cacao powder
3-4 tablespoons raw agave
The ganache should be the texture of very thick chocolate icing. Spoon it over the top of the middle layer and smooth it with a metal spatula.
Chill the Nutter Butter Bars in the refrigerator for an hour.
Remove from the pan by using the parchment to gently lift them out. Cut into bars with a sharp knife.
Store covered in the refrigerator for up to a week.
How to “melt” raw coconut oil—or raw cacao butter.
Place the amount of coconut oil (or cacao butter) you wish to “melt” in a small glass bowl.
(If you’re melting cacao butter grate or finely chop it. I used a standard cheese grater for this purpose.)
Pour hot tap water (about 100-105 degrees) into a shallow pan and place the bowl holding coconut oil—or grated cacao butter—in it being careful not to allow the water to spill into the bowl holding the coconut oil. Gently stir the coconut oil until it has become liquid.
PRINT RECIPE


 Soup or Stew