You Might Enjoy...

Bacon Wrapped Turkey Spiedini

Day After Thanksgiving Salad & Cranberry Vinaigrette

Maple Marshmallow Creme Filled Whoopie Pies

Check out 30 Days to Easy GF Living!


Gluten Free Global Community


Proud member of FoodBlogs

Entries in Gluten-free (110)

Monday
May182009

Chocolate Ice Cream Sliders (GF, DairyFree & Vegan)

This coming weekend is Memorial Day. It’s the official beginning of Summer, right?

We’re having a bit of a cold snap here in the Northeast but the weather report promises each day will be warmer than the previous one. So fingers crossed Memorial Day will arrive in perfect picnic form.  Despite that optimism a woman I met at a flea market this weekend (as we braved the cold) told me Memorial Day is always colder than Halloween. Come to think of it she’s probaby right. But, many people think of this weekend as the gateway to summer and it’s probably because we’re ready for sun and warmth and…

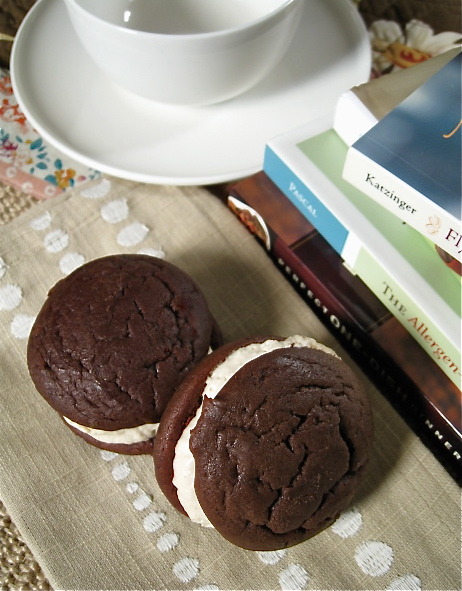
…ice cream sandwiches. Little ice cream sandwiches—sliders, in fact.

It’s thrilling (yes, thrilling) to make ice cream sandwiches that are gluten-free, dairy-free, and egg-free. It’s thrilling because I can eat them and they taste good—and because I can share them with all of you! They’re so delicious everyone will love them. So you may have to hide them behind the frozen veggies and fruit toward the back of the freezer if you plan to get one for yourself. Or, just make a double batch. That’ll work, too.

The cool thing about this recipe is it makes a mean Dutch Chocolate Cookie. That’s how the recipe started. I wanted to make chocolate cookies and used a very old Hershey’s recipe as a basis for a GF, CF, and EF version. The taste was so similar to the classic ice cream sandwich I thought I might see if it would work. And, it did.

Ice Cream Sliders (& Dutch Chocolate Cookies)

1/2 cup Earth Balance
2/3 cup sugar
1 teaspoon Ener-G egg replacer
2 tablespoons warm water
1½ tablespoons rice milk
1 teaspoon vanilla
½ cup sorghum flour
¼ cup sweet rice flour
¼ cup tapioca flour
½ cup unsweetened cocoa powder
1 teaspoon xanthan
¼ teaspoon salt
1 pint Turtle Mountain Purely Decadent Coconut Vanilla Bean Ice Cream

Heat the oven to 350 degrees.

Whisk together the egg replacer and 2 tablespoons warm water. Beat shortening, sugar, mixed egg replacer, milk, and vanilla in a stand mixer until creamy.

Mix flours, cocoa, xanthan, and salt in a separate medium sized bowl. Stir these together with a wire whisk until they are thoroughly incorporated and there are no lumps.

Put the mixer on low and slowly add the dry ingredients to the wet mixture. Scrape the sides from time to time. Beat for a few minutes until all the ingredients are combined. The dough will be somewhat stiff.

Refrigerate the dough for about an hour.

Shape the dough into ¾-1 inch balls making sure they are uniform in size. Place onto a parchment lined cookie sheet about 1½ inches apart.

Cut a small piece of parchment—about 3 x 3 inches—and lay over one of the dough balls. With a large flat-bottomed glass or other object (I used a stainless steel measuring cup) firmly and evenly press down on the dough until it reaches about 3/16 inches in depth. Repeat with the remaining cookies.*

Bake for 20 minutes. Remove from the oven and let sit for a minute or two. Using the same parchment square and flat-bottomed glass gently press the cookies one more time while they are warm. Remove to a wire rack and cool. Makes about 16-18 cookies.

Once the cookies are cool you can make the sliders or freeze the cookies for later use.

To assemble the sliders: place one cookie flat side up. Place a small scoop of the ice cream on top of it and then press the second cookie (flat side down) onto the ice cream until it resembles a small ice cream sandwich.

Wrap each slider in wax paper and store in the freezer in a plastic container.

*This recipe also makes very nice Dutch Chocolate Cookies. Just roll the dough balls in turbinado sugar and press each cookie lightly with the glass (using parchment) to squash them slightly. Bake a little longer—about 22 minutes total.

PRINT RECIPE

Saturday
May162009

Potato Cauliflower Pizza Crust & Great American GF Pizza Challenge

Who doesn’t love pizza? I know I love it. For a lot of reasons. It’s an easy and inexpensive meal for the family. It tastes good. It’s fun to meet with friends over pizza and a beer. Let’s face it—eating pizza is a beloved American pastime.

So, I will not give up on pizza simply because I can’t eat it in it’s original form. A great GF pizza is out there somewhere and I’ll find it. Some of you may already have already found yours. (And, if so, please share! See the GF Pizza Challenge below.) I am still searching.

My search has yielded some interesting finds. There’s a non-GF pizza that avoids yeast by using beer or club soda. And, then there’s one from Rustico Cooking who brings us a classic recipe from southern Italy. It’s not the least bit like our American pizza but it’s perfectly perfect because the main ingredient is potato and the recipe uses very little flour. Check it out: Pizza di Patate Pugilese (Tomato and Cheese Topped Potato Pizza). Finally, I came across a fascinating cauliflower pizza created for low-carb living.

As usual I played around with all these recipes and a few more. The idea of using potato and cauliflower intrigued me. It sounded like it would be good, healthy, and tasty. It seemed like it would be a fun kitchen challenge. And, it is and it was.

The result is a nice alternative to traditional pizza. Although it isn’t as stiff as a regular pizza it can be picked up and eaten with your hands if you like. The pizza shells can be frozen after the first baking to top and finish cooking at a later time. If you don’t have or want to use cauliflower you can always substitute another cup of potato and it will work just fine.

Potato Cauliflower Pizza Crust

2 cups potatoes, boiled and riced
1 cup cauliflower, roasted and chopped
salt and pepper
1 teaspoon extra-virgin olive oil, plus extra for the baking pan
1/2 cup gluten free flour (see below), plus extra for the counter
1 tablespoon freshly grated Parmigiano Reggiano (optional)
1/2 teaspoon dried oregano
1/2 tablespoon dried basil
½ teaspoon salt
3 tablespoons water

Topping Options
2/3 cups tomato sauce
1/4 cup freshly grated Parmigiana Reggiano
1/2 cup roasted broccoli florets, coarsely chopped
3 tablespoons kalamata olives, coarsely chopped
2 tablespoons sundried tomatoes, chopped
1/4 cup shredded mozzarella

Preheat the oven to 350℉. Convection Roast works great for those of you with this oven setting.

Place the potatoes (about 3 large) in a pot. Add cool water enough to cover by an inch or two. Bring to a boil, reduce to a medium heat and cook about 30 minutes until tender when pierced with a knife. Drain, peel and pass through a ricer. Let cool to room temperature.

While the potatoes are boiling cut up the cauliflower (or use 8 ounces frozen cauliflower), spread out on a parchment lined cookie sheet, sprinkle with olive oil, salt and pepper. You can roast any other vegetables for toppings — broccoli, peppers, eggplant - at the same time. Pop into a 350℉ oven for about 15 minutes. Keep an eye on them and take them out when they are just getting brown.

Remove the vegetables and turn off the oven. When the oven is cool put the baking stone back in and preheat to 450°F. (Again, Convection Roast works best.)

Chop the cauliflower into a small mince or put into your food processor and process until it looks like it’s been coarsely chopped. You do not want it to look like mashed potatoes. (Prior to this step I like to press them in the ricer to extract any moisture. The large cauliflower pieces don’t go through the ricer holes but they compress and the water drains.)

Mix the potatoes, cauliflower, flour, salt and herbs in a medium bowl. Add 2 tablespoons water and mix in by hand to create a soft dough. Add more water, if needed, a little at a time to help the dough come together. You don’t want sticky dough. If this happens add a little flour.

At this point you can decide if you want one large pizza, 2 smaller ones, or 3 personal. Divide the dough accordingly.

Place the dough on a lightly floured piece of parchment. Flatten it into a disk, sprinkle with a little flour and cover with another piece of parchment. Roll it out with a rolling pin to the desired thickness. Thinner is probably better — around an 1/8 inch or so.

Peel off the top layer of parchment. Drizzle the top of the dough with a little olive oil. Pop it into the oven on top of the pizza stone keeping the bottom parchment paper in tact. This makes it much easier to work with. Bake about 8-10 minutes until you start to see it turning golden around the edges.

Remove from the oven, top with sauce and your other favorite toppings. Return to the oven for 5-7 minutes, or until brown around the edges. Serve hot. Serves 3 as a main course, 6-8 as an appetizer.

Flour mixture: 1/2 cup sorghum flour, 1/4 brown rice flour, 1/4 cup finely ground cornmeal, 1/2 tsp xanthan gum.

PRINT RECIPE

The Great American GF Pizza Challenge

We all know there’s a great resource of GF (CF or dairy-free, no-eggs, no-yeast, etc.) chefs, cooks, bakers, moms, dads, teens, etc. out there who have great pizza recipes to share with the rest of us who are searching for a favorite! So, here’s your chance to wow us. Anything goes. I’m looking forward to the creativity and yuminess yet to come!

Please feel free to use “Post a Comment” below to tell us about your entry or add your recipe if you don’t have a blog or site. Thanks for sharing.

GF Pizza Challenge Participants

1. Mary Frances - gluten free pan pizza
2. Mary Frances - gluten free pizza crust
3. Annalise Roberts - pizza crust & link to brown rice flour mix
4. Dr. Jean Layton - GF Whole Grain Pizza
5. Kristen Campbell - gluten-free, casein-free, almond crust pizza

Powered by… Mister Linky’s Magical Widgets.

Had to end the Mister Linky’s link tool due to technical issues. So, for now, if you have a GF Pizza recipe you’d like to share please leave a comment with a link to your recipe. Thanks!